Before
I start telling you about the project I want to invite everyone to
like my 18” Doll Facebook page. I have found my dollhouse miniature
dedicated page to be a wonderful way to communicate with everyone so
I want to add that to the 18” doll projects too. I will announce
when I post blogs and videos but it is also a place where all of you
can interact. Feel free to post photos of your doll projects and to
ask questions. You can find the Facebook page here
 | |
| here are the finished pans ready for something yummy to be put in them |
Today
I am showing one way to make an easy baking pan for your dolls. This
pan is supposed to represent a 13” by 9” pan in real life. I took
a few liberties with the measurements so it is pretty close but if
you do the math you will find would not measure exact. This is
because I wanted to keep the cutting and folding measurements easy to
do. Also I have noticed even in real life these measurements can vary
depending on what company made your particular baking pan.
I
chose this size for a couple of reasons. Number 1 is that we are
going to do a food video next week and we will need this pan for
that. And secondly I know that over the years in my real kitchen this
is the size pan I pull out the most in my real cooking so I figured
it would be something our dolls could use too.
The
pan we are making can either be made to look like ceramic/stoneware
or metal. That depends on which paints you choose to use.
We
are starting with a piece of what I refer to as paper board. By this
I mean the lightweight cardboard that is used to package real food
like crackers, cereal, etc from our real kitchens. I use these so
much that I keep a box of the flattened boxes in my craft room. When
I start to run out I put more in there instead of the recycling bin.
They really don't take up much space and they are just so handy. I am
planning a lot of projects on this channel/blog using this material.
We
begin by cutting a piece of our paperboard to 4 ¼” by 6”. Our
next step is to score on the lines we want to fold. On the short ends
we need to score at ¼” and at ¾” from each end. On the long
sides we score at ½” from the edge. I like to turn my paperboard
over and score those ¼” score lines from the other side too. They
are actually going to fold the opposite direction from the rest of
the folds and since it is such a narrow spot the extra bit of scoring
makes this soooo much easier.
Pre-fold
all these scored lines making sure to really crease the folds flat.
This will make your pan turn out much nicer in the end.
Now
we need to cut on the lines indicated in this diagram:
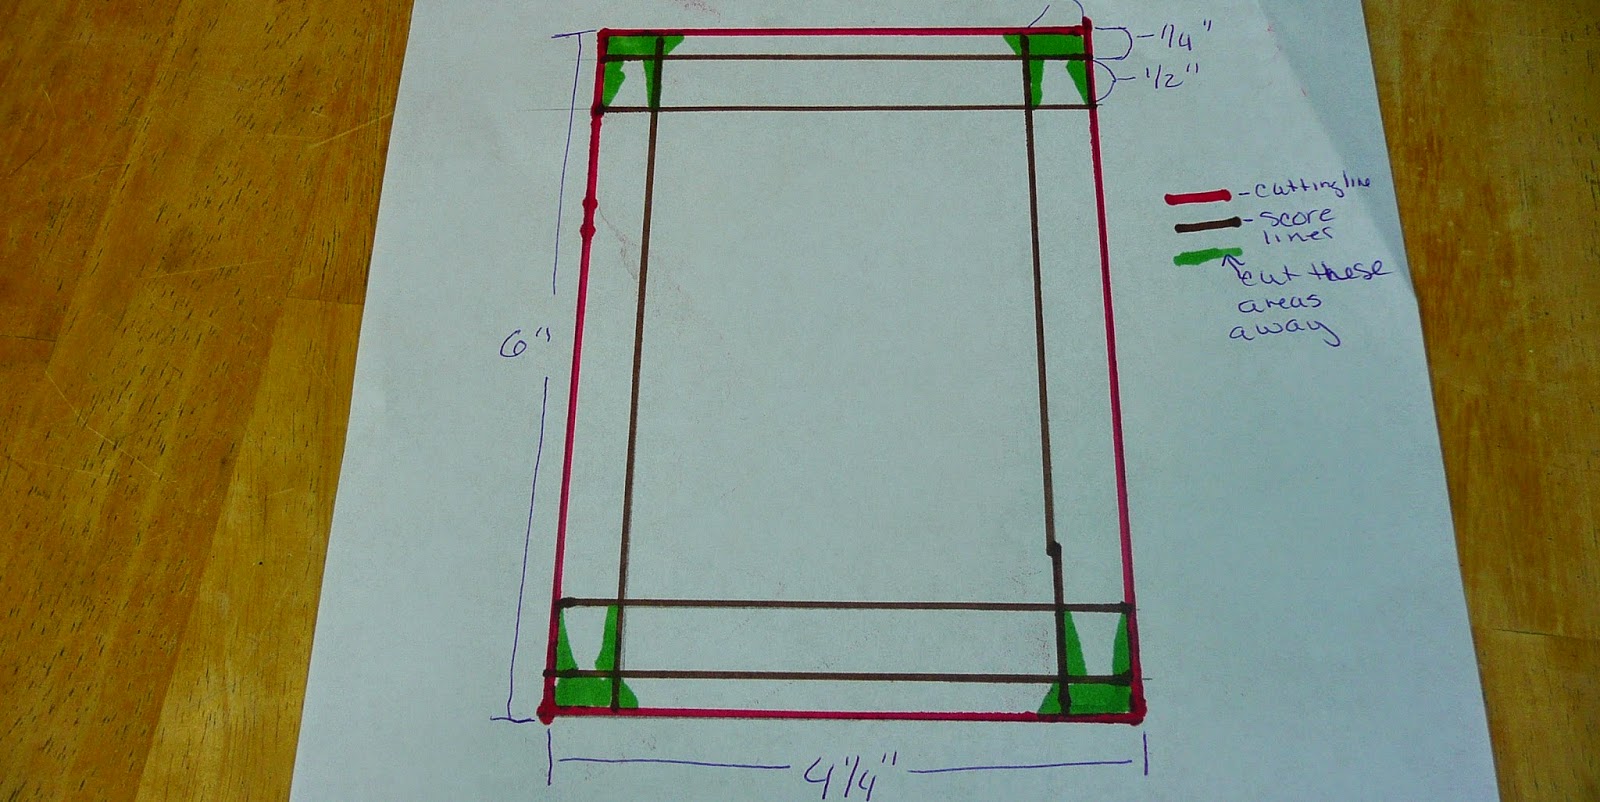 |
| red lines are the initial cutting lines, score on the brown, then cut away the areas indicated in green |
Notice
the areas that I indicated to cut away too.
Now
we are going to glue our pans at the ends. I make sure that my short
tabs are glued on the outside of these to make they look more
realistic. Be sure to clamp the glued areas, we want to make sure
these stay where we want them. The little steps like this that we
take now will pay of in the end with a much nicer finished item. Now
walk away and let that glue dry completely. It is really important
for the glue to get all the way dry before we move on.
While
the glue is drying you can decide what color you want to paint you
baking pan. If you want to make it look metal I recommend using the
Delta Ceramcoat brand metallic silver. I have much better luck with
that brand for the silver paint. If you have another favorite use it
but if you are shopping try to find that one. For the metal version
you will also need some black craft paint.
If
you are going to go the ceramic/stoneware route you will need white
craft paint and whatever color(s) you want. Sometimes I paint the
pans the same color on both the outside as the inside and sometimes I
make the inside white and use a color on the outside. It is up to
you. You may even want to paint designs on the sides, if you are
undecided take a few minutes to check online for photos of real
baking pans for ideas.
I did find out on my prototype pan that some of the color from the box labels will bleed through the white paint after the clear finish is added. (It didn't show until the clear finish was almost dry) I did some experimenting and I have found that Gesso seems to block that bleeding of color. So if you want to make an all white (or other light color baking pan) I would suggest doing the priming coat with a white Gesso rather than with white craft paint. If you are painting the outside a darker color go ahead and use the craft paint.
Once
the glue is completely dry we are going to base coat our baking pans.
Use either the white or black craft paint and be sure to coat both
the inside and the outside of the pan at the same time. I know this
is messy but until it has at least 2 good coats of paint to seal the
paperboard you need to make sure that you have both sides of it wet
at the same time. This step prevents the paperboard from warping as
much. You can tell when you have enough on that you can paint the
sides separately; at that point you will no longer be able to see the
color on the paperboard through the paint. I usually find 2 coats is
about right as long as I am using a good quality of paint. The
cheaper, thinner paints might need more coats.
Now
paint the final color onto your pan. For this step you can paint just
one side of the paperboard and be sure to let it dry completely
between coats.
If
you are going for a metal pan you are done at this point unless you
want to coat it with a satin finish sealer. For a ceramic/stoneware
finish follow up with a couple of coats of a high gloss sealer. Allow
the sealer to completely dry between coats.
No comments:
Post a Comment